How to Burn Realistic Fabric in Pyrography Portraits
 Kez Halliday
Learn how to burn realistic fabric textures in pyrography portraits. Step-by-step tips for shading folds, adding depth, and creating lifelike results
How to Burn Realistic Fabric in Pyrography Portraits
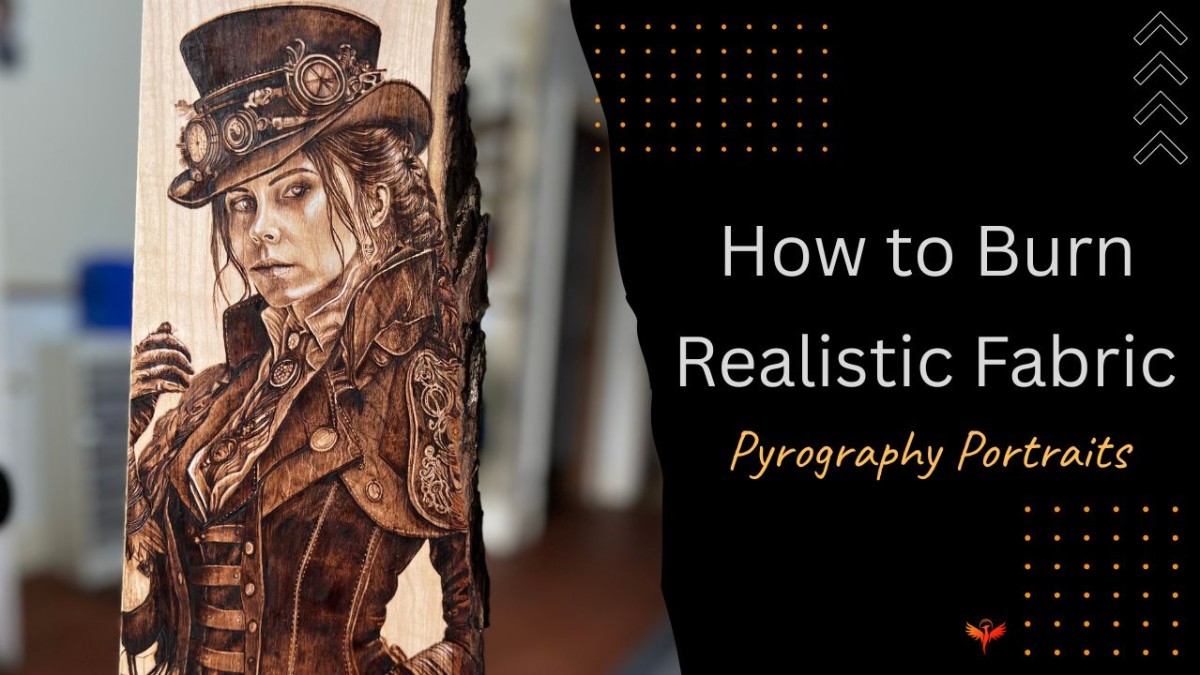
When it comes to pyrography portraits, it’s often the little details that bring a piece to life. You’ve carefully captured the eyes, softened the shading in the skin, maybe even added the glint of a smile, then comes the shirt, scarf, or jacket. And suddenly, fabric feels like a mountain to climb.
Don’t worry, you’re not alone. Burning realistic fabric textures is one of the trickiest (and most rewarding) parts of portrait pyrography. Today, I’ll walk you through how to approach fabric so it looks natural, dimensional, and soft without it distracting from the face you’ve worked so hard on.
At Phoenix Pyrography, I believe every artist can Burn With Confidence, so let’s break this down into practical, achievable steps.
Step 1: Study the Fabric First
Before your pen touches the wood, pause. Look at your reference photo closely.
-
Where are the folds? Notice where fabric bunches, curves, or stretches.
-
Where’s the light source? Shadows will define how deep or soft those folds appear.
-
What type of fabric is it? Cotton, denim, silk—all burn differently in appearance, even though you’re only working with tonal values.
Tip: Squint at your photo to simplify the values into light, midtone, and dark. This helps you avoid overcomplicating folds.
Step 2: Map Out the Main Folds
Use a very light pencil sketch or even just your eye to guide you. Start with the biggest, most obvious folds first. Think of them as the “landmarks” of your fabric.
When you begin burning, keep your pen pressure light almost like a whisper so you don’t accidentally go too dark too soon.
Step 3: Layer Your Shading
Fabric is all about gradual changes, not harsh lines.
-
Use gentle tonal layers to build shadows.
-
Work in small circular motions or smooth, even strokes to avoid a scratchy look.
-
Always soften your edges—fabric rarely has razor-sharp borders.
Quick win: When in doubt, go lighter first. You can always deepen the burn, but it’s much harder to lift it.
Step 4: Create Contrast for Depth
The secret to realistic fabric is contrast. Those deep folds? Push them darker than you think. The highlighted ridges? Leave them almost untouched.
Think of it like sculpting—the highs and lows are what give fabric its 3D effect.
Step 5: Add Texture (but Don’t Overdo It)
Not all fabric needs texture marks. For example:
-
Smooth fabrics (like silk or cotton) rely more on soft shading than on texture lines.
-
Rougher fabrics (like denim or wool) can benefit from light cross-hatching or stippling, carefully burned at a low heat.
Less is more. Suggest texture rather than fully drawing every thread.
Step 6: Step Back Often
Here’s the thing: when you’re nose-to-wood, it’s easy to overwork an area. Every few minutes, lean back and look at your portrait as a whole. Ask yourself:
-
Does the fabric support the portrait, or is it stealing attention?
-
Do the folds look soft and natural?
Fabric should complement the story of your portrait, not shout over it.
Common Mistakes to Avoid
- Outlining folds too heavily. This makes fabric look cartoonish.
- Making every crease equally dark. Real fabric has variety
- Forgetting the light source. Without consistent light, fabric looks flat.
Final Thoughts
Burning realistic fabric takes patience, but it’s a skill that will elevate your portraits dramatically. By focusing on values, soft edges, and subtle textures, you’ll find your fabric looks natural and believable.
Remember: fabric doesn’t need to be perfect—it needs to feel right in the context of the portrait. With each project, you’ll sharpen your eye and your control.
So next time you face a tricky shirt collar or scarf, breathe, slow down, and let your pen dance with confidence.
Because here at Phoenix Pyrography, I want you to always Burn With Confidence.
If you’d love more step-by-step guidance and a community of artists cheering you on, you’re always welcome inside the
⚡Phoenix Membership⚡ this is where we burn together, learn together, and most importantly, Burn With Confidence.
Categories: : How to create shading, Realistic Portraits